49 Slicing GemPy Lith Blocks in PyVista with GemGIS
Contents
49 Slicing GemPy Lith Blocks in PyVista with GemGIS#
The lith block of a GemPy model can be loaded as a volume into PyVista and be sliced to get geological cross sections. The different slicing options are introduced here.
Set File Paths and download Tutorial Data#
If you downloaded the latest GemGIS version from the Github repository, append the path so that the package can be imported successfully. Otherwise, it is recommended to install GemGIS via pip install gemgis and import GemGIS using import gemgis as gg. In addition, the file path to the folder where the data is being stored is set. The tutorial data is downloaded using Pooch (https://www.fatiando.org/pooch/latest/index.html) and stored in the specified folder. Use
pip install pooch if Pooch is not installed on your system yet.
[1]:
import gemgis as gg

file_path ='data/49_slicing_gempy_lith_blocks_in_pyvista_with_gemgis/'
WARNING (theano.configdefaults): g++ not available, if using conda: `conda install m2w64-toolchain`
C:\Users\ale93371\Anaconda3\envs\test_gempy\lib\site-packages\theano\configdefaults.py:560: UserWarning: DeprecationWarning: there is no c++ compiler.This is deprecated and with Theano 0.11 a c++ compiler will be mandatory
  warnings.warn("DeprecationWarning: there is no c++ compiler."
WARNING (theano.configdefaults): g++ not detected ! Theano will be unable to execute optimized C-implementations (for both CPU and GPU) and will default to Python implementations. Performance will be severely degraded. To remove this warning, set Theano flags cxx to an empty string.
WARNING (theano.tensor.blas): Using NumPy C-API based implementation for BLAS functions.
[2]:
gg.download_gemgis_data.download_tutorial_data(filename="49_slicing_gempy_lith_blocks_in_pyvista_with_gemgis.zip", dirpath=file_path)
Downloading file '49_slicing_gempy_lith_blocks_in_pyvista_with_gemgis.zip' from 'https://rwth-aachen.sciebo.de/s/AfXRsZywYDbUF34/download?path=%2F49_slicing_gempy_lith_blocks_in_pyvista_with_gemgis.zip' to 'C:\Users\ale93371\Documents\gemgis\docs\getting_started\tutorial\data\49_slicing_gempy_lith_blocks_in_pyvista_with_gemgis'.
Loading the lith block#
The lith block of a computed GemPy model is loaded using NumPy and reshaped to the original dimensions (resolution) of the model.
[2]:
import pyvista as pv
import numpy as np

lith_block = np.load(file_path + 'lith_block.npy').reshape(50,50,50)
lith_block[0]
WARNING (theano.configdefaults): g++ not available, if using conda: `conda install m2w64-toolchain`
C:\Users\ale93371\Anaconda3\envs\test_gempy\lib\site-packages\theano\configdefaults.py:560: UserWarning: DeprecationWarning: there is no c++ compiler.This is deprecated and with Theano 0.11 a c++ compiler will be mandatory
  warnings.warn("DeprecationWarning: there is no c++ compiler."
WARNING (theano.configdefaults): g++ not detected ! Theano will be unable to execute optimized C-implementations (for both CPU and GPU) and will default to Python implementations. Performance will be severely degraded. To remove this warning, set Theano flags cxx to an empty string.
WARNING (theano.tensor.blas): Using NumPy C-API based implementation for BLAS functions.
[2]:
array([[1., 1., 1., ..., 1., 1., 1.],
       [1., 1., 1., ..., 1., 1., 1.],
       [1., 1., 1., ..., 1., 1., 1.],
       ...,
       [3., 3., 3., ..., 2., 2., 1.],
       [3., 3., 3., ..., 2., 2., 2.],
       [3., 3., 3., ..., 2., 2., 2.]])
All values above the topography representing air are assigned NaN values so that they can be hidden from the visualization.
[3]:
lith_block[lith_block == 1] = np.nan
lith_block[:0]
[3]:
array([], shape=(0, 50, 50), dtype=float64)
Wrapping the object#
The array can now be wrapped using pv.wrap(..) to create a volume.
[4]:
volume = pv.wrap(lith_block)
volume
[4]:
| Header | Data Arrays | ||||||||||||||||||||||||||||||
|---|---|---|---|---|---|---|---|---|---|---|---|---|---|---|---|---|---|---|---|---|---|---|---|---|---|---|---|---|---|---|---|
|
|
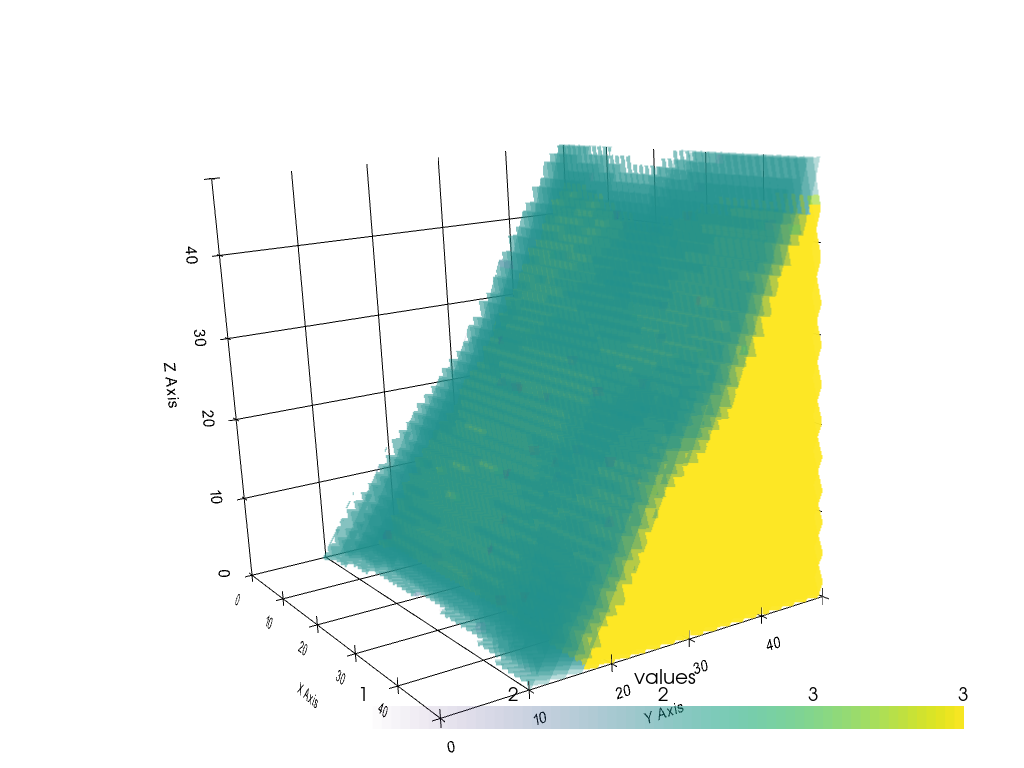
[5]:
sargs = dict(fmt="%.0f", color='black')

p = pv.Plotter(notebook=True)
p.camera_position = [(161.91360339500804, -56.76742646880152, 61.85062200360107), (24.5, 24.5, 24.5), (-0.16718411386271567, 0.1641218812347994, 0.9721694709112653)]

p.add_volume(volume, scalar_bar_args=sargs)

p.show_grid(color='black')
p.set_background(color='white')
p.show()

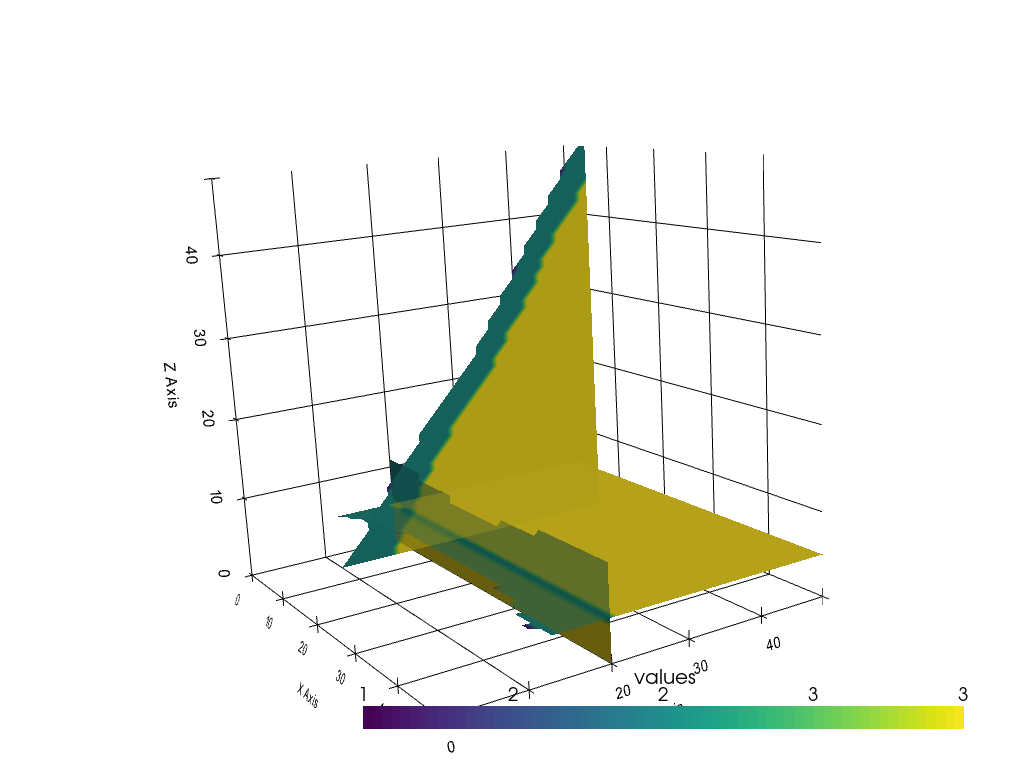
Slicing the volume orthogonally#
When slicing the volume, a multi block object is created where the different blocks represent the different slices.
[6]:
slices = volume.slice_orthogonal()
slices
[6]:
| Information | Blocks | ||||||||||||||||||||||
|---|---|---|---|---|---|---|---|---|---|---|---|---|---|---|---|---|---|---|---|---|---|---|---|
|
|
[7]:
sargs = dict(fmt="%.0f", color='black')

p = pv.Plotter(notebook=True)
p.camera_position = [(161.91360339500804, -56.76742646880152, 61.85062200360107), (24.5, 24.5, 24.5), (-0.16718411386271567, 0.1641218812347994, 0.9721694709112653)]

p.add_mesh(slices, scalar_bar_args=sargs, nan_opacity=0)

p.show_grid(color='black')
p.set_background(color='white')
p.show()
[8]:
slices = volume.slice_orthogonal(x=5, y=20, z=5)
slices
[8]:
| Information | Blocks | ||||||||||||||||||||||
|---|---|---|---|---|---|---|---|---|---|---|---|---|---|---|---|---|---|---|---|---|---|---|---|
|
|
The orthogonal slices can be easily translated throughout the volume.
[9]:
sargs = dict(fmt="%.0f", color='black')

p = pv.Plotter(notebook=True)
p.camera_position = [(161.91360339500804, -56.76742646880152, 61.85062200360107), (24.5, 24.5, 24.5), (-0.16718411386271567, 0.1641218812347994, 0.9721694709112653)]

p.add_mesh(slices, scalar_bar_args=sargs, nan_opacity=0)

p.show_grid(color='black')
p.set_background(color='white')
p.show()
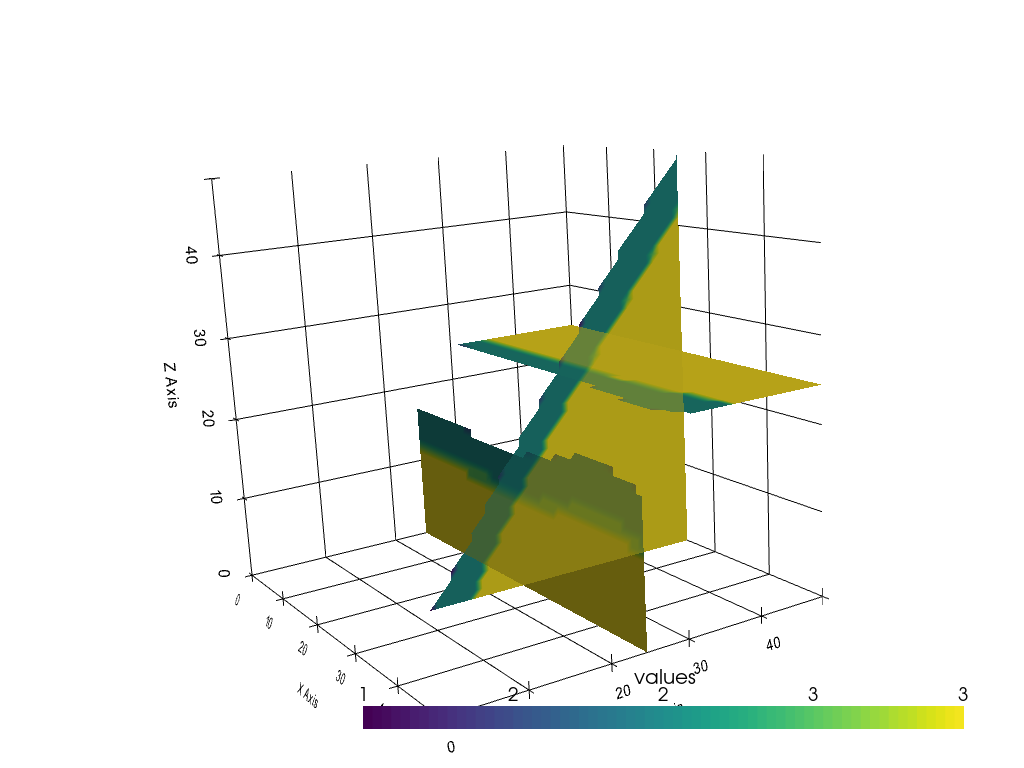
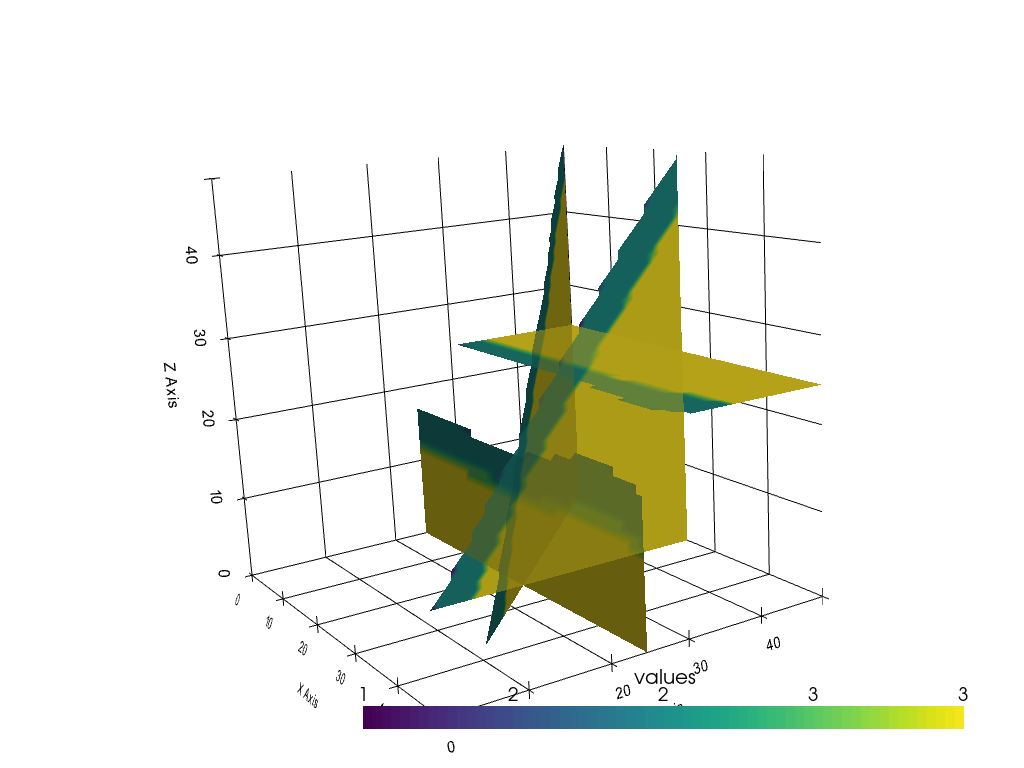
Adding single slices#
Arbitrary single slices can also be extracted. The origin defaults to the center of the mesh.
[10]:
single_slice1 = volume.slice(normal=[1, 1, 0])
single_slice1
[10]:
| Header | Data Arrays | ||||||||||||||||||||||||||
|---|---|---|---|---|---|---|---|---|---|---|---|---|---|---|---|---|---|---|---|---|---|---|---|---|---|---|---|
|
|
[11]:
single_slice2 = volume.slice(normal=[1, 0, 0])
single_slice2
[11]:
| Header | Data Arrays | ||||||||||||||||||||||||||
|---|---|---|---|---|---|---|---|---|---|---|---|---|---|---|---|---|---|---|---|---|---|---|---|---|---|---|---|
|
|
[12]:
single_slice3 = volume.slice(normal=[0, 1, 0])
single_slice3
[12]:
| Header | Data Arrays | ||||||||||||||||||||||||||
|---|---|---|---|---|---|---|---|---|---|---|---|---|---|---|---|---|---|---|---|---|---|---|---|---|---|---|---|
|
|
[13]:
single_slice4 = volume.slice(normal=[0, 0, 1])
single_slice4
[13]:
| Header | Data Arrays | ||||||||||||||||||||||||||
|---|---|---|---|---|---|---|---|---|---|---|---|---|---|---|---|---|---|---|---|---|---|---|---|---|---|---|---|
|
|
[14]:
sargs = dict(fmt="%.0f", color='black')

p = pv.Plotter(notebook=True)
p.camera_position = [(161.91360339500804, -56.76742646880152, 61.85062200360107), (24.5, 24.5, 24.5), (-0.16718411386271567, 0.1641218812347994, 0.9721694709112653)]

p.add_mesh(single_slice1, scalar_bar_args=sargs, nan_opacity=0)
p.add_mesh(single_slice2, scalar_bar_args=sargs, nan_opacity=0)
p.add_mesh(single_slice3, scalar_bar_args=sargs, nan_opacity=0)
p.add_mesh(single_slice4, scalar_bar_args=sargs, nan_opacity=0)

p.show_grid(color='black')
p.set_background(color='white')
p.show()
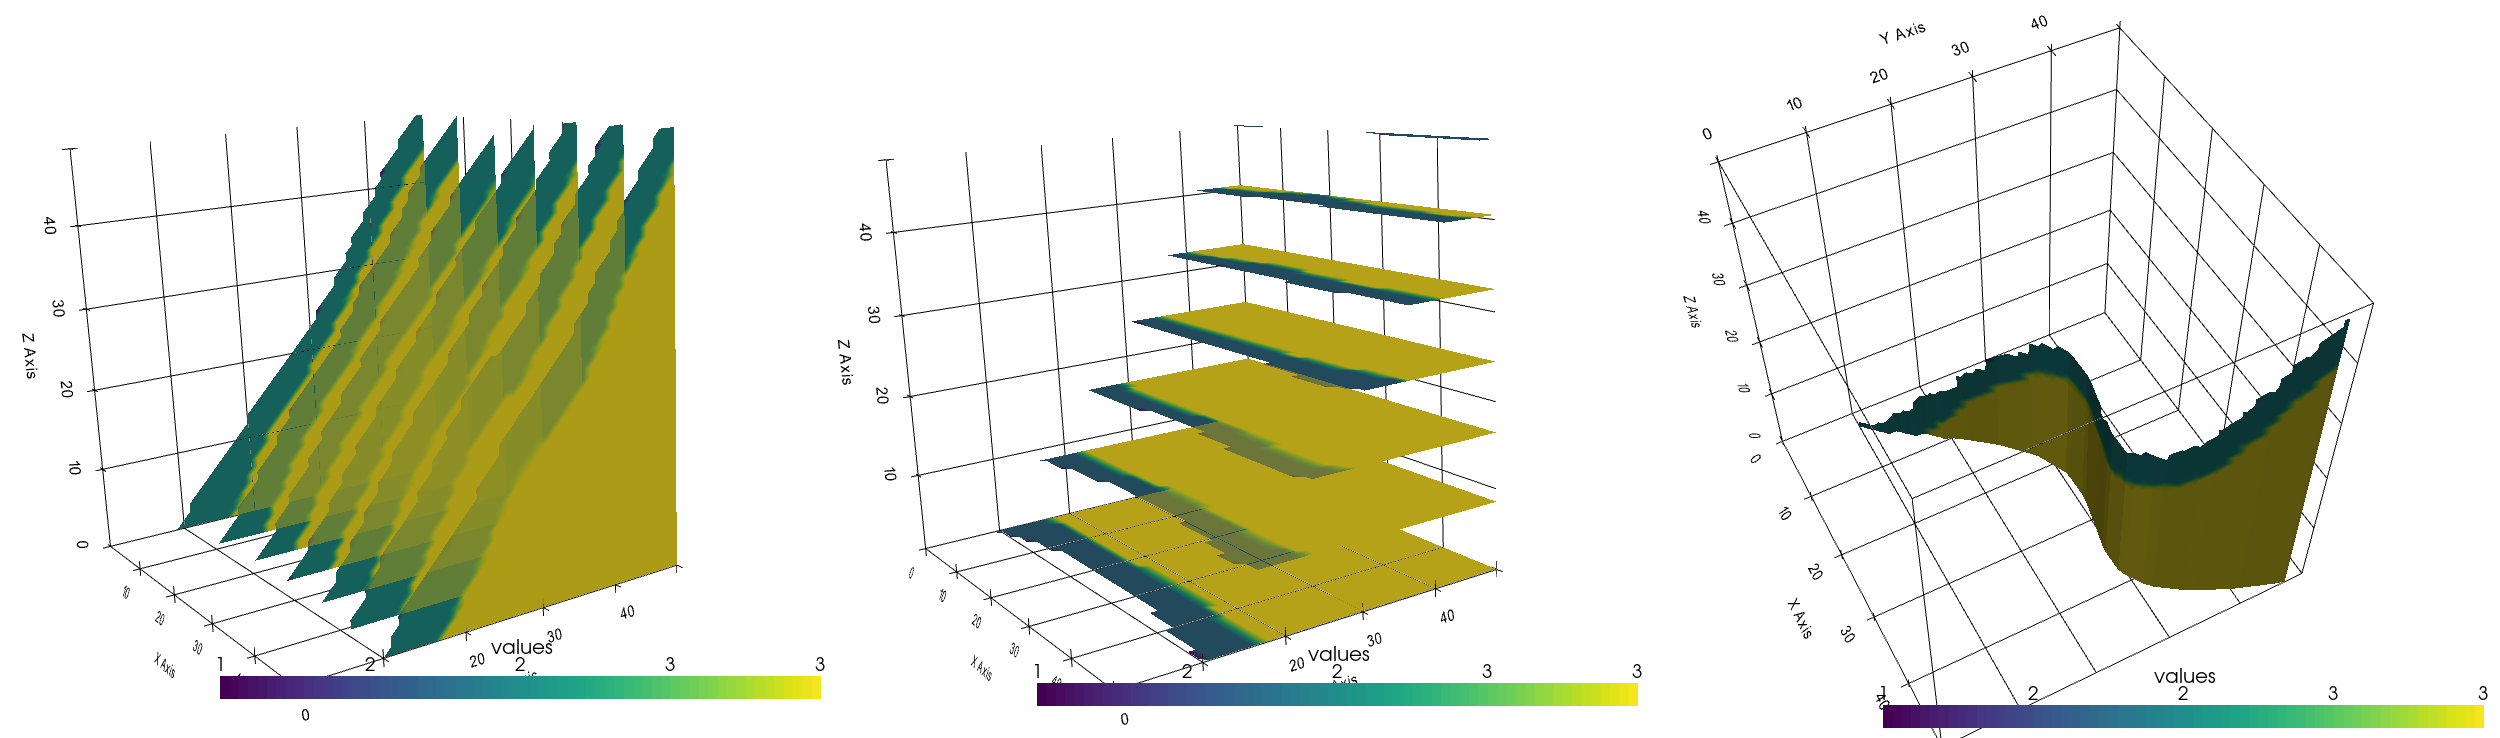
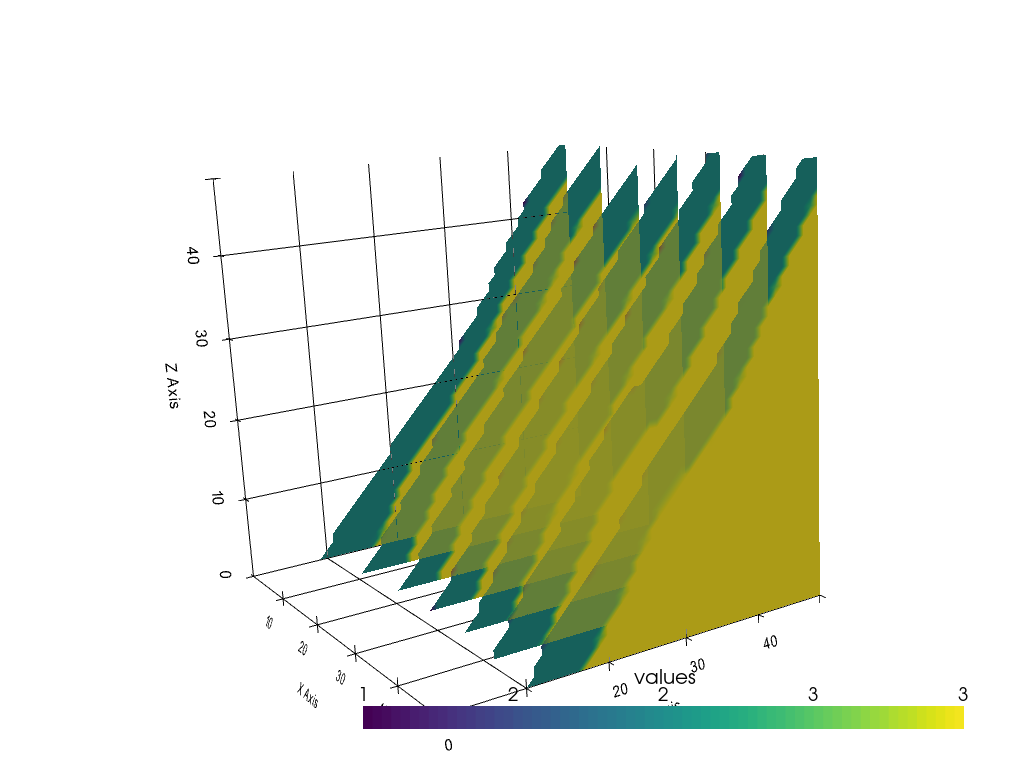
Slices uniformly accross an axial direction#
Adding slicing planes uniformly across an axial direction can also be automated using slice_along_axis(..).
[15]:
slices = volume.slice_along_axis(n=7, axis="x")
slices
[15]:
| Information | Blocks | ||||||||||||||||||||||||||||||||||
|---|---|---|---|---|---|---|---|---|---|---|---|---|---|---|---|---|---|---|---|---|---|---|---|---|---|---|---|---|---|---|---|---|---|---|---|
|
|
[16]:
sargs = dict(fmt="%.0f", color='black')

p = pv.Plotter(notebook=True)
p.camera_position = [(161.91360339500804, -56.76742646880152, 61.85062200360107), (24.5, 24.5, 24.5), (-0.16718411386271567, 0.1641218812347994, 0.9721694709112653)]

p.add_mesh(slices, scalar_bar_args=sargs, nan_opacity=0)

p.show_grid(color='black')
p.set_background(color='white')
p.show()
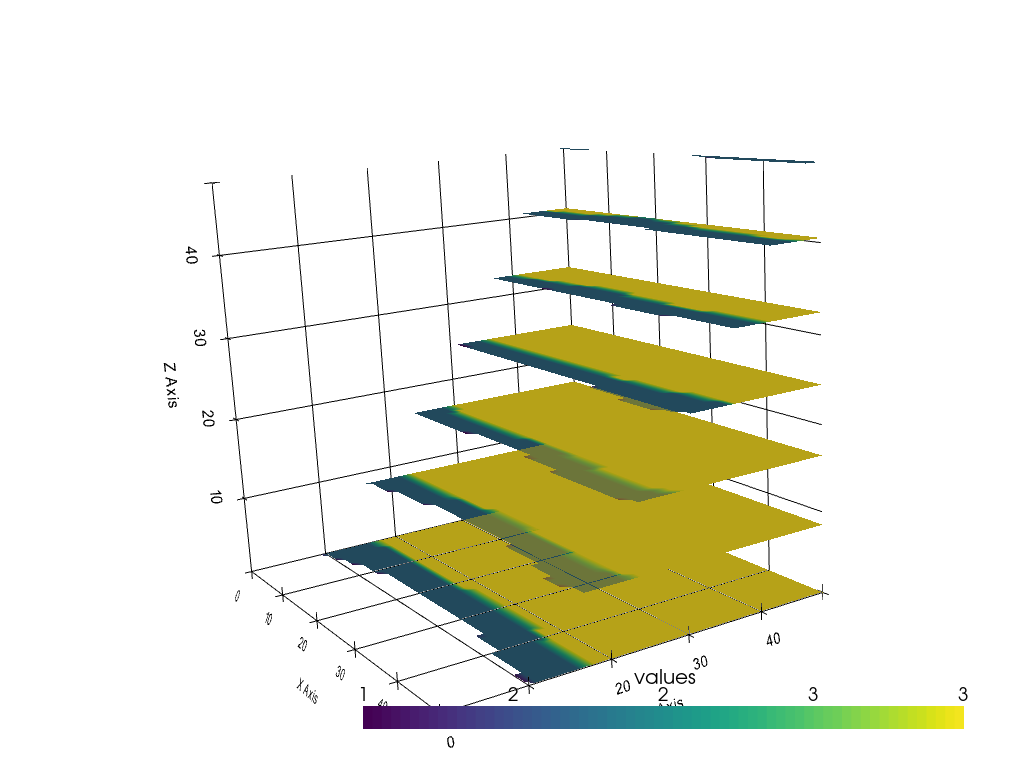
[17]:
slices = volume.slice_along_axis(n=7, axis="z")
slices
[17]:
| Information | Blocks | ||||||||||||||||||||||||||||||||||
|---|---|---|---|---|---|---|---|---|---|---|---|---|---|---|---|---|---|---|---|---|---|---|---|---|---|---|---|---|---|---|---|---|---|---|---|
|
|
[18]:
sargs = dict(fmt="%.0f", color='black')

p = pv.Plotter(notebook=True)
p.camera_position = [(161.91360339500804, -56.76742646880152, 61.85062200360107), (24.5, 24.5, 24.5), (-0.16718411386271567, 0.1641218812347994, 0.9721694709112653)]

p.add_mesh(slices, scalar_bar_args=sargs, nan_opacity=0)

p.show_grid(color='black')
p.set_background(color='white')
p.show()
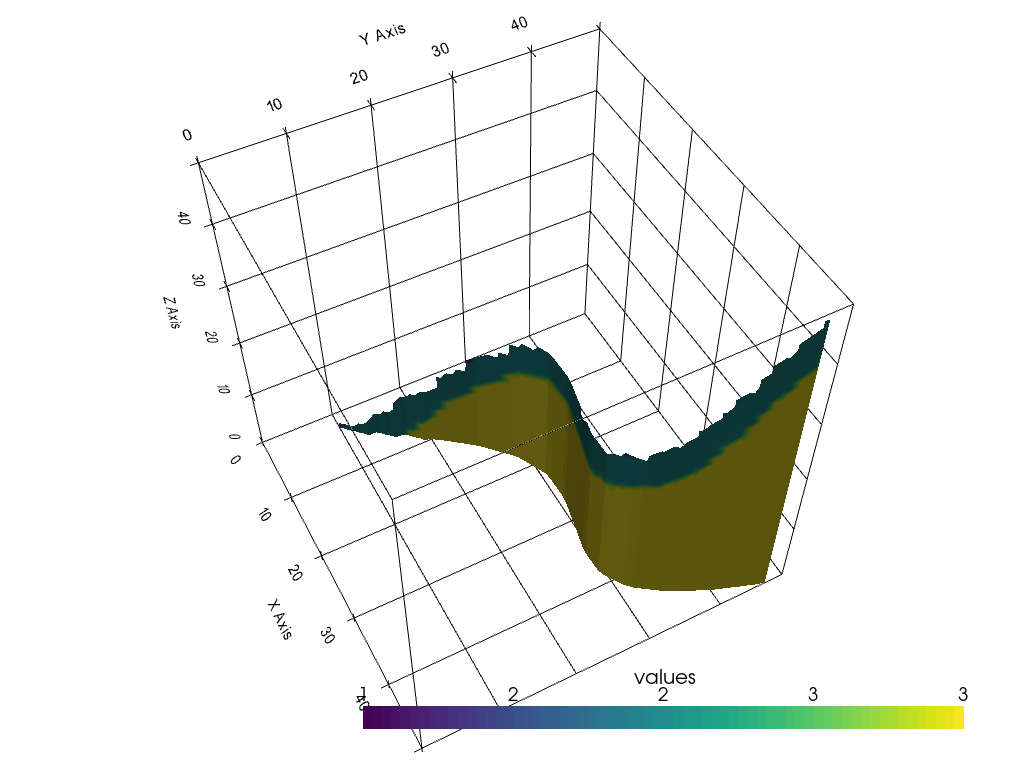
Cross section along a given LineString/Profile#
A cross section can also be extracted along a predefined LineString, such as a Profile Line on the surface.
[19]:
from shapely.geometry import LineString

linestring = LineString([(10,20,0), (20,30,0), (40,30,0), (50,50,0)])
linestring
[19]:

[20]:
np.asarray(linestring)
[20]:
array([[10., 20.,  0.],
       [20., 30.,  0.],
       [40., 30.,  0.],
       [50., 50.,  0.]])
[21]:
spline = pv.Spline(np.asarray(linestring),15)
spline
[21]:
| Header | Data Arrays | ||||||||||||||||||||||||||
|---|---|---|---|---|---|---|---|---|---|---|---|---|---|---|---|---|---|---|---|---|---|---|---|---|---|---|---|
|
|
[22]:
slice = volume.slice_along_line(spline)
slice
[22]:
| Header | Data Arrays | ||||||||||||||||||||||||||
|---|---|---|---|---|---|---|---|---|---|---|---|---|---|---|---|---|---|---|---|---|---|---|---|---|---|---|---|
|
|
[23]:
sargs = dict(fmt="%.0f", color='black')

p = pv.Plotter(notebook=True)
p.camera_position = [(116.94895879808979, -23.54486636447751, 151.0971674252113), (24.5, 24.5, 24.5), (-0.6820986393942956, 0.36187292918718394, 0.6354442770675789)]
p.add_mesh(slice, scalar_bar_args=sargs, nan_opacity=0)

p.show_grid(color='black')
p.set_background(color='white')
p.add_mesh(volume.outline(), color="k")
p.show()
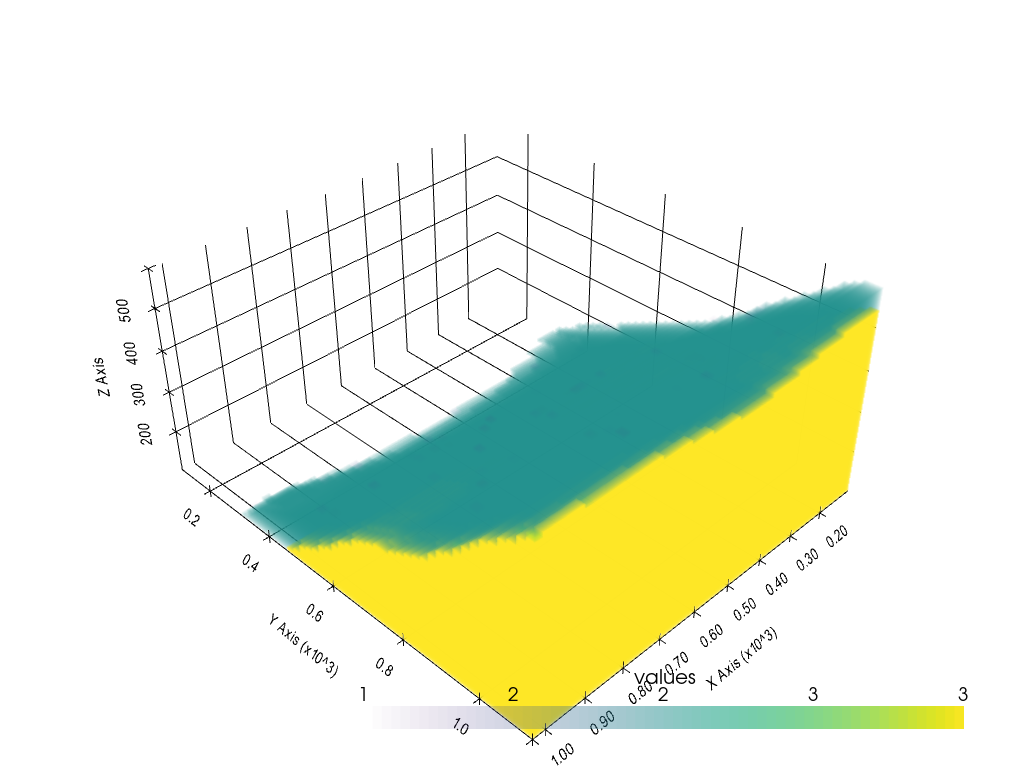
Translating the volume and changing cell size#
As the lith block was opened as NumPy array, the spatial information of the location of the block and the size of each block was lost. By assigning new values to the origin and spacing attribute of the volume, the volume can be translated to its real world coordinates and the cell size can be adjusted to fit the model cell sizes. Do not interchange the number of cells with size of each cell which is calculated by the length of each model dimension divided by the number of cells. The
loaded volume was located at 0,0,0 and each cell had the dimension of 1,1,1.
[24]:
volume
[24]:
| Header | Data Arrays | ||||||||||||||||||||||||||||||
|---|---|---|---|---|---|---|---|---|---|---|---|---|---|---|---|---|---|---|---|---|---|---|---|---|---|---|---|---|---|---|---|
|
|
[25]:
sargs = dict(fmt="%.0f", color='black')

p = pv.Plotter(notebook=True)
p.camera_position = [(161.91360339500804, -56.76742646880152, 61.85062200360107), (24.5, 24.5, 24.5), (-0.16718411386271567, 0.1641218812347994, 0.9721694709112653)]

p.add_volume(volume, scalar_bar_args=sargs)

p.show_grid(color='black')
p.set_background(color='white')
p.show()
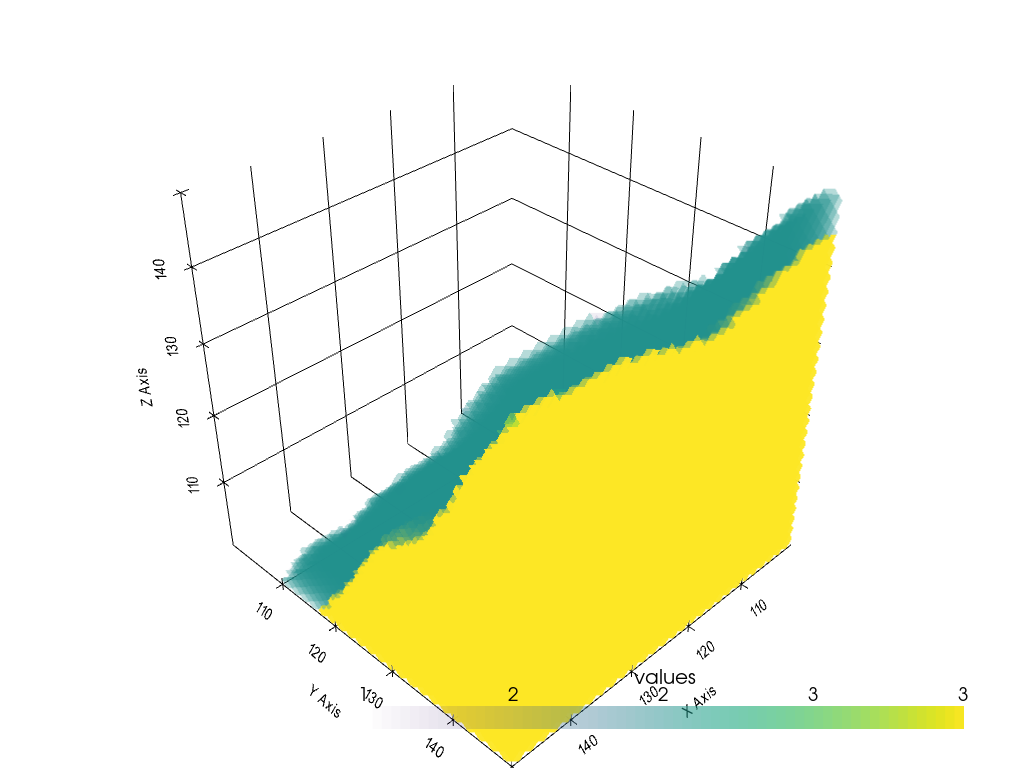
Changing the origin#
[26]:
volume.origin = [100,100,100]
volume.origin
[26]:
[100.0, 100.0, 100.0]
[27]:
sargs = dict(fmt="%.0f", color='black')

p = pv.Plotter(notebook=True)

p.add_volume(volume, scalar_bar_args=sargs)

p.show_grid(color='black')
p.set_background(color='white')
p.show()
Changing the cell size#
[28]:
volume.spacing = [19, 21, 10]
volume.spacing
[28]:
[19.0, 21.0, 10.0]
[29]:
sargs = dict(fmt="%.0f", color='black')

p = pv.Plotter(notebook=True)

p.add_volume(volume, scalar_bar_args=sargs)

p.show_grid(color='black')
p.set_background(color='white')
p.show()